Accessing the Dashboard
Finding your Blogs
Finding your RSS Feed
Mapping a Domain
Permalinks
Updating your Profile
Accessing the Dashboard
The WordPress Dashboard is the administrative view of ODU WordPress, and serves as the hub for all of the changes you’ll make, including choosing new themes, writing posts, updating your password, etc. You can create and have access to an unlimited number of blogs; each of these has its own Dashboard.
You can access your WordPress Dashboard in one of several ways:
1) When you visit the ODU WordPress homepage and log in, you will be automatically taken to the Dashboard of the first blog you created or were given permission to access.
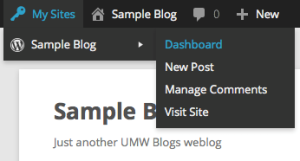
2) If you are looking at the front page of a site on ODU WordPress, you can hover your mouse over the home icon and select Dashboard from the drop-down menu that appears.
3) When you are logged in, you can see a list of sites you have access to by hovering your mouse over the My Sites icon. Hovering over a blog’s name will give you quick access to that blog’s Dashboard.
4) No matter where you are, you can always add admin to the end of your blog’s URL, and that will take you to that blog’s Dashboard. (If you are not logged in, you will be prompted to do so, and then taken to the Dashboard.) For example: if your blog is located at http://site name here.odu.org/, then your Dashboard can be accessed at http://sitenamehere.odu.org/admin.
Finding your Blogs
To find blogs you have created for yourself, as well as course blogs to which you have already added yourself, log into ODU WordPress and hover your mouse over the My Sites icon near the top left corner.
Finding your RSS Feed
This will pull a page that will not really be useful to you, but you can grab the URL at the top and plug it into a RSS reader such as tiny tiny RSS and it will display it in a readable format that will give you the latest updates.
From your homepage or where ever your posts appear, simply add “/rss” or “/feed” to your URL, “http://sampleblog.umwblogs.org/feed/”
Mapping a Domain
WordPress does allow for the ability to map external Domain names to internal WordPress sites. If you have an external Domain Name, open a footprints ticket (https://fp.odu.edu or email to itshelp@odu.edu) and request this service. Be sure to include the external name you have purchased. Once this is received, a Domain Mapping tool will be provided to your site. Once this is done to map a domain, click on “Tools” on the left sidebar, then when the sub menu opens click “Domain Mapping.”
On the new page that opens up you can add Domain Names to your site. Additional assistance from ITS will be provided.
Permalinks
Part of the popularity of WordPress is how easily it makes a website functional and yet attractive. One of the smaller details that you might want to adjust is how the addresses to your blog posts are structured. Permalink is the name given to the address of an individual blog post because they are “permanent links”. For example, a sample blog would be http://www.domainname here.com/site namehere/. The link to the first post, titled “Hello World” may be structured in many ways. The screenshot below shows one way.
So http://www.domainnamehere.com/sitenamehere/postname/ may get you to that blog post, but it’s a little vague. With WordPress, you have many options to form the links to posts, and you can change them to specifically tailor each post. To change the permalink structure, start by going to the Dashboard.
Next, go to Settings > Permalinks.
As you can see, there are several choices under Common Settings. The Default setting gives us that uninformative “?p=123”. A popular choice is to use the Post name choice, which is a bit more informative. So our post titled “Hello World” will have an address of http://www.domainnamehere.com/sitenamehere/uncategorized/postnamehere/.
If you want to have the date as part of the address, you can choose Day and name or Month and name. You can also change the structure of category and tag names under the Optional section.
Finally, when you write a page, you have the option of editing the permalink for an individual page. Just click the Edit button (underneath the Title field).
Then type in whatever is appropriate (and hasn’t been used yet). Generally you want to make it as simple and short a word, or words, as makes sense.
Updating your Profile
Your profile contains identifying information about you, including your display name, email address, password, and avatar. To access your profile, make sure you are logged into ODU WordPress, and look in the top right-hand corner of the browser window. You should see a welcome message, along with a small picture.
To access and/or update your profile, hover your mouse over the “Welcome” message, and click the Edit My Profile link that appears in the drop-down menu.
Updating Your Name
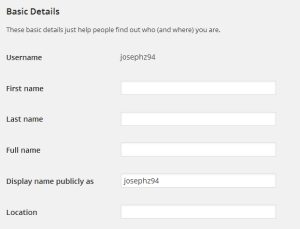
Most WordPress themes display information about the author of a post; by default, because ODU WordPress uses Shibboleth to configure user accounts, you will not be able to change your username, First Name, Last Name or email address. You can configure or change your Nickname or publicly displayed name. To choose how your name should be displayed throughout ODU WordPress:
1) Fill out the Name area of your profile.
2) Use the “Display name publicly as” drop-down menu to pick how others will see you.
The only box that must be filled out in this area is the nickname; if you are uncomfortable in having your real name displayed on ODU WordPress, pick a pseudonym and let your professors know what name you are using.
Changing Your Password
WordPress user accounts and Passwords are controlled through your shibboleth login (Monarch Key). When you go to the Edit Profile page, you will notice that the Username, First Name, Last Name, and email address are visible but grayed. These options are not available for users to change. You will also notice that there is not an option to change your password. If you need to change your password, you should go to Midas.
Setting up your Gravatar
Many areas of WordPress display a small image next to your name (for example, in the Howdy menu in the top-right corner of the window). To update this image, you can use a free service called Gravatar (Globally Recognized Avatar). This service allows you to create an account, input one or more email addresses that you use, and then to associate pictures with those email addresses.
To change your ODU WordPress avatar:
1) Visit the Gravatar home page and sign up for an account with your @odu.edu email address.
2) Upload a picture (of yourself, a pet, etc) into Gravatar, and ask it to associate that image with your @odu.edu email address.
3) Save your changes, and within a little while, ODU WordPress will automatically begin associating the image you uploaded with your ODU WordPress account. This doesn’t always happen immediately, so you may need to wait for this to happen.
Other Notes:
- If you have trouble creating your Gravatar, try checking the Gravatar support site.
- Gravatars are usually displayed as a small image, so for best results, use a square image in which a single subject takes up most of the space.
- The account you create on Gravatar can also be used to access WordPress.com. Although WordPress.com uses the same underlying software that ODU WordPress does, these two usernames/passwords are completely separate from one another, and are not interchangable. That said, having a WordPress.com account can provide you with access to a number of other features and services, so it’s a good idea to create one.
Changing language on a per site basis
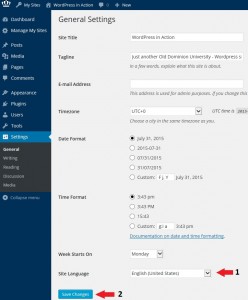
Users can override the default network language settings and set their own preferred default language using Settings > General.
- Click on Setting > General in the site admin dashboard.
- Select the default language under site language.
- Then click Save Changes


