Preproduction vs Production
Activating your ODU site
Quick Guide to Making a Site
Changing your site’s name
Changing the Language
Preproduction vs Production
ODU provides two different servers for WordPress. The first is Preproduction. Preproduction allows users to safely experiment with their site, offline and behind a firewall. This makes it a safe place to play with your site and plugins without worrying about how others view see your site. Lastly, all new plugins and themes are first loaded into Preproduction for testing before being placed in Production, again this gives users a chance to try new try new things in a secure environment.
The second server is Production. This is where everything that is published is live on the internet. Production is what will be holding your final product and allow you maintain it. It is encouraged that you build your site in Preproduction and maintain it in Production.
The best part is once you have your site looking how you want it, all you have to do is export the file from Preproduction, log into Production, and import it there. More help on that process can be found in the Importing and Exporting tutorial.
Activating your ODU site
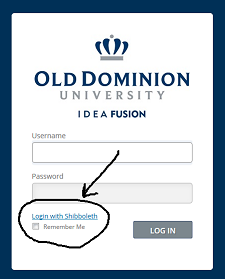
To create your ODU WordPress site go to ODU WordPress (or the preproduction login) then click on Shibboleth login to access the system.
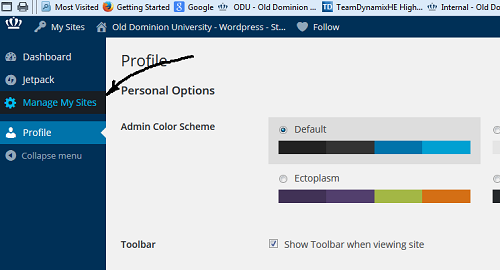
You will need your Midas ID and password for Monarch Key authentication to access the administrative panels in WordPress. If you have multiple roles at ODU, the Monarch Key authentication selector will provide you the option to chose what account you wish to use to log into WordPress with. Once you are logged in you will land on your default profile page. Select the ODU My Sites configuration tool in the Admin Menu to access a list of all your sites and/or create new ones.
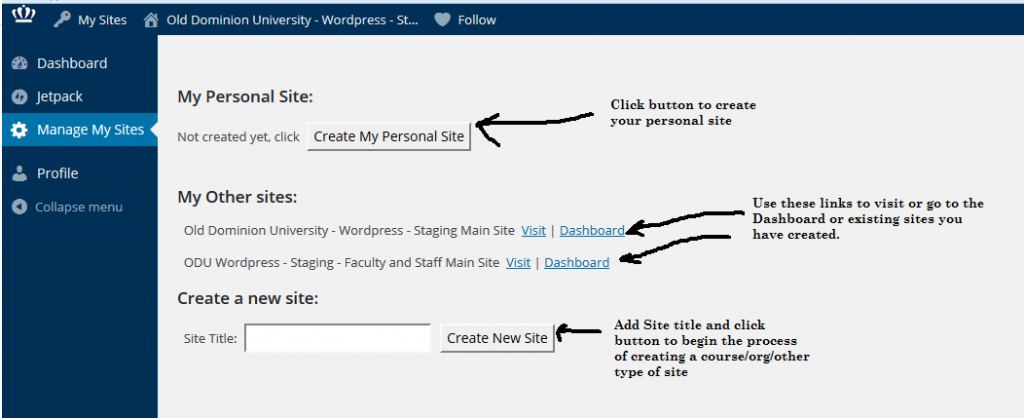
The ODU My Site configuration tool will provide you information on all sites you currently have access to on the system based on your logged in user account.. The upper portion will document your personal site. If it has been configured, you will be provided links to access it. If it has not been configured, you will be provided a button to create your personal site for that account.
You can create one personal site for each identity role you have at ODU and the site name will default to your Midas ID located on the WordPress network associated with that role. This means if you have only one role at ODU (i.e. faculty, staff or student) you can create a single personal site. If you have multiple roles (i.e. you are both staff and student, or faculty and student) you will be able to create a personal site for each based on Midas ID and email.
The lower section of the tool will document your course, research, organization, club or other sites. In addition to personal sites, all users have the capability to create as many course, research, organization, club or other ODU affiliated sites as they need to manage their academic career. The configuration tool will provide a link to each and provide you the ability to create new ones if needed.
When you first create a site you will be prompted to create the site address. Here are a few tips:
- Use only lowercase letters and numbers in the site address.
- Do not have any spaces in the site address
- There are a number of banned site names which includes words such as admin, root or other system type names in addition to currently used office and staff names such as “academicaffairs”. If you pick a site name that is on the banned list, the system will prompt you for a new site name.
- It is recommended that course sites use common terms to identify the course related, the faculty and semester. Possible formats might be
course+ CRN (i.e. engl30710234),
course + semester (i.e. engl307fall15),
faculty + semester (i.e. jdoefall15) or
coure + CRN + faculty (i.e. engl30712345jdoe).
Bear in mind that courses may be available on the system for many years, so keep the names short, simple and easily identifiable.
- Sites for ODU approved student organizations should have the faculty sponsor as one of the administrators for the site.
- An activation email is sent to your email when your site is set up. Insure any spam filters or restrictions are lifted to ensure mail reaches your inbox. Additionally, new pages will automatically show up in your ODU My Sites Configuration tool after they have been created.
More information on WordPress policies can be found here.
Quick Guide to making your site
When you first start your site it can feel overwhelming and you may not know where to begin. We recommend you complete the following tasks in this order. In depth information on how to accomplish these tasks can be found in throughout the tutorials.
- Activate your site
- Pick a theme that suites your needs
- Customize the overall appearance of the site in the appearance tab (background, header, etc) and theme options (if applicable), come back for widgets and menus later
- Create content. Make a few posts and pages so have something to build with. Maybe a homepage (if you aren’t using a blog page as a home page), a contact page, about me, courses enrolled in (or teaching).
- Connect your posts and pages via menus and widgets so you can navigate your site as you wish
- Play with plugins and widgets to fine tune your site
- Add more content.
- Repeat steps 5-7 until your site is complete
Changing Your Site’s Name
If at any point you wish to name your site something different but do not want to change anything else (and you don’t want to export it to import it under a new site), you can simply rename your site. THIS WILL NOT CHANGE THE URL OF YOUR WEBSITE.
- From the dashboard select the settings tab.
- Under the “General” section the very first box should be titled “Site Title”. Enter your site’s new name here and save it.
Changing Your Site’s Language
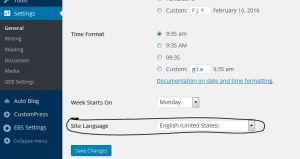
By default your site will be in English, however this can be changed by going to the Settings tab in your dashboard view. In the general settings section, scroll down until you see a languages section. Pick your desired language from the drop-down click “Save Changes.”


