The following is a list of plugins and a brief description of how to use them. The steps used assume you know how to navigate the WordPress interface and start immediately after activating the plugin from the Plugin tab. Please note some plugins may currently only be available in Preproduction or Production. The descriptions use the following terms you may not know:
Tab – When editing your sites the left side of the screen contains a menu that allows you to navigate different aspects of your site. Each menu item (i.e. Posts, Pages, Settings, Tools, Dashboard, etc.) is a tab.
Section – Each tab is made out of sub menu items, we will call these sections.
Short-code – Some plugins will supply you a segment of code surrounded by [ ]. These are called short-codes, you place them in the visual editor of a text or page to utilize a feature, outside object, or special formatting.
* – ITS Admins only
Plugins
[toggles class=”yourcustomclass”]
[toggle title=”Advanced iFrame ” class=”in”]
Description: This plugin allows you to embed a window on your page showing a different webpage.
How to use: Go to a page you would like to add the iFrame in and click the button to add the short-code, labeled “Add Advanced iFrame” after the the ” but before the ] add in src=”paste site url here”. To go more in-depth (such as changing window size) you can explore the Advanced iFrame settings page.
More Information can be found at: https://wordpress.org/plugins/advanced-iframe/
[/toggle]
[toggle title=”Akismet”]
Description: Akismet checks your comments against the Akismet Web service to see if they look like spam or not and lets you review the spam it catches under your blog’s “Comments” admin screen.
How to use: Hover over the Jetpack tab then click Akismet. From there you will able to configure your settings which help you monitor comments and change the strictness of the plugin.
More Information can be found at: https://wordpress.org/plugins/akismet/
[/toggle]
[toggle title=”AMR Shortcode”]
Description: Include any widget in a page for any theme.
How to use:
Insert a widget or multiple widgets or a entire widget area (sidebar) into a page using a shortcode.
Set up your widget first in a normal sidebar. Check it works. THEN Drag your chosen widgets to the sidebar called “widgets for shortcode”.
Add the do_widget shortcode to the page where you would like the widget to appear (or the do_widget_area)
More Information can be found at:https://wordpress.org/plugins/amr-shortcode-any-widget/
[/toggle]
[toggle title=”Anthologize”]
Description: This plugin allows you to display your site’s content as a book.
How to use: This plugin is currently experiencing problems and being investigated.
More Information can be found at:https://wordpress.org/plugins/anthologize/
[/toggle]
[toggle title=”Appointments+”]
Description: This plugin allows people to make an appointment with you.
How to use: Start off by going to the Settings section of the Appointments tab. A tutorial should automatically trigger, if not simply go through the tabs and settings to create your available schedule and the user interface (make sure you turn on the display portion). Once you have the settings to your liking you may link the create an appointment page to the rest of your site using a menu. You may also find some shortcodes in the Shortcodes section to help place the information into any page. Your users can now request appointments. You can check the Appointments section for active, or pending appointments. To confirm an appointment click the Pending Appointments tab on this page, click the appointment you would like to view and change the status to confirmed. As a reminder ODU policy prohibits you to charge a fee this way for any appointments. This plugin also allows you to place a few widgets showing your services offered and providers, as well as a calendar of availabilities.
The plugin supports several add-ons to further support it
More Information can be found at: https://wordpress.org/plugins/appointments/
[/toggle]
[toggle title=”AutoBlog”]
Description: This plugin allows you to automatically have posts from other blogs posted onto your page.
How to use: This plugin is currently experiencing problems and being investigated.
More Information can be found at:https://premium.wpmudev.org/project/autoblog/
[/toggle]
[toggle title=”AVH Extend Categories Widgets”]
Description: This plugin allows you to choose which categories are displayed.
How to use: This can be as simple as placing the AVH Extended Categories widget and turning categories on and off. For more customization, you can place categories into groups and display different groups onto different pages. To do this go to the AVH Extended Categories tab then to the Category Groups section, and create a group to place categories in (you only need to name it). Then click it on the overview section and scroll down to edit which categories are associated with that group. Now place the AVH Extended Categories:Category Group widget into one of the widget zones in the appearance tab. Finally go to each page to choose which group it is associated with.
More Information can be found at:https://wordpress.org/plugins/extended-categories-widget/
[/toggle]
[toggle title=”Awesome Flickr Gallery”]
Description: This plugin allows you to display your gallery from Flickr.
How to use: First go to the Default Settings section of the Awesome Flickr Gallery. Find your Flickr ID in the URL of your profile page (its a series of number and letters), you will also need to create an app on the Flickr site and get the API Key. Once you have the settings the way you want them go to the Add Gallery section. Choose where from your Flickr you want to pull the photos from and how you wish to display them and save. You can now get a short-code from the Saved Galleries section. Paste the short-code into the visual editor of the post or page you wish to insert the gallery. You can edit the galleries you create by selecting the Edit Galleries section. There is also a Flickr widget that can display your photostream in the sidebar.
More Information can be found at:https://wordpress.org/plugins/awesome-flickr-gallery-plugin/
[/toggle]
[toggle title=”Better RSS Widgett”]
Description: Replacement for the build in RSS widget that adds an optional link target, shortcode_handler, and page conditionals
How to use: This plugin does not, and cannot replace the existing RSS Widget. Once you install, activate, and configure this plugin you must go to your Widgets page and either replace existing RSS widgets with the new widget, or add new Better RSS Widgets.
More Information can be found at: https://wordpress.org/plugins/better-rss-widgett/
[/toggle]
[toggle title=”Black Studio TinyMCE Widget”]
Description: This plugin adds a visual editor widget to your available widgets.
How to use: You may access it in the Widgets section of the Appearance tab.
More Information can be found at:https://wordpress.org/plugins/black-studio-tinymce-widget/
[/toggle]
[toggle title=”Blogger Importer”]
Description: This plugin will help you import your blog from Blogger.
How to use: Go to the Tools tab and Import section. Select Blogger and then upload your XML file to be imported.
More Information can be found at:https://wordpress.org/plugins/blogger-importer/
[/toggle]
[toggle title=”Blurbrry PowerPress and Blurbrry Multi-site add-on”]
Description: This plugin allows you to link your Blurbrry account with your site.
How to use: You may also use it to embed your podcast, audio, or video into your page. Simply go to the PowerPress tab and pick the section that fits what you want to do. The audio and video players need to be picked and configured which can be done in their respective sections. The Settings section lets you change the podcast settings as well as your iTunes settings and how it all appears on your site. The Migrating Media section lets you migrate your media directly to your Blurbrry account. You may also place a widget to allows site visitors to subscribe to your podcast.
More Information can be found at:https://wordpress.org/plugins/powerpress/
[/toggle]
[toggle title=”Booking Calendar”]
Description: This plugin allows you to manage appointments by either manually adding them yourself or having others request a day.
How to use: This plugin only allows one potential appointment per day. You can post your calendar in a post or page by clicking the booking calendar icon in the toolbar of the visual editor or you may place it a sidebar by accessing the widgets in the Widgets section of the Appearance tab. Appointments can also be created by using the Add Booking section of the Booking tab (this is only available to select roles). ALL appointments must be confirmed by selecting them from the Booking tab and approving them or deleting them (the Reject action sets it as pending). You may adjust your availability and display settings by going to the Settings section of the Booking tab.
More Information can be found at:https://wordpress.org/plugins/booking/
[/toggle]
[toggle title=”BuddyPress and BuddyPress Activity Plus”]
Description: These plugins allow your site visitors to create profiles, message each other, form groups, and post videos, text, and pictures (similar to a Facebook setting).
How to Use: The related widgets can be place by using the Widgets section of the Appearance tab. Settings that control what features are available and who they are available to can be found in the Settings tab under the BuddyPress and Activity Plus sections. This plugin is currently experiencing problems and being investigated. or
More Information can be found at:https://wordpress.org/plugins/buddypress/ or https://wordpress.org/plugins/buddypress-activity-plus/
[/toggle]
[toggle title=”Category Specific RSS Menu”]
Description: A simple WordPress plugin to add category specific RSS subscription menu into your posts, pages, or sidebars.
How to Use: This WordPress plugin allows you to present a menu with multiple RSS feed subscription options to your site’s visitors in addition to your normal RSS subscription options.
If your site covers multiple topics then your subscribed readers may get annoyed when you update your site with content that they are not interested in. This plugin allows you to show category specific RSS feeds for all of your categories. Alternatively you can configure up to 8 different custom topic specific RSS feeds.
More Information can be found at: https://wordpress.org/plugins/category-specific-rss-feed-menu/ or https://www.tipsandtricks-hq.com/wordpress-plugin-for-category-specific-rss-feed-subscription-menu-325
[/toggle]
[toggle title=”Clean and Simple Contact Form”]
Description: This plugin allows you to easily place a contact form within a page.
How to use: Add cscf-contact-form inside closed brackets into the visual editor of any post or page to create the following prompt:
By going to the Settings tab and then Contact Form section you can change the associated email, or the pre-written greeting or make other simple changes to the form.
More Information can be found at:https://wordpress.org/plugins/clean-and-simple-contact-form-by-meg-nicholas/
[/toggle]
[toggle title=”*Code Embed”]
Description: The plugin allows you to embed JavaScript and HTML primarily – in a post. This is incredibly useful for embedding video, etc.
How to use: Once this plugin is activated, begin a new post or page. In the Custom Fields meta box enter a “keyname” for you embed code. Save this. In your post or page add a %keyname% where you wish the embed code will appear.
More Information can be found at: https://wordpress.org/plugins/simple-embed-code/
[/toggle]
[toggle title=”CommentPress Core”]
Description: This plugin allows you to comment within a page (or even paragraph).

How to use: This plugin only works with the CommentPress Core Theme (which is very plain and limited in functionality). Several settings can be found in the Settings tab under CommentPress Core section.
More Information can be found at:https://wordpress.org/plugins/commentpress-core/
[/toggle]
[toggle title=”Comments Plus”]
Description: This plugin allows users to post comments via their Facebook or Twitter accounts in addition to their WordPress accounts.
How to use: This plugin requires you to create an app on Twitter or Facebook. Once your app is created simply copy the app id and secret into the settings page, adjust the styling settings as you desire and save.
More Information can be found at:https://premium.wpmudev.org/project/comments-plus/
[/toggle]
[toggle title=”Contact Form 7″]
Description: This plugin allows you to insert a simple contact form into your posts or pages.
How to use: Simply go to the Contact tab and copy the short-code for the existing contact form. Then paste the short-code into the visual editor of any post or page (make sure to include the [ ]). You can create a multiple different forms to use by using the Add New section of the Contact tab (this will require coding experience).
More Information can be found at:https://wordpress.org/plugins/contact-form-7/
[/toggle]
[toggle title=”CSV Importer”]
Description: This plugin allows you to import data from a CSV file as posts.
How to use: Go to the CSV Importer section of the Tools tab. Select which category to place the posts in and upload your CSV file.
More Information can be found at:https://wordpress.org/plugins/csv-importer/
[/toggle]
[toggle title=”Custom Sidebars Pro”]
Description: This plugin allows you to create multiple widget areas so you can use a different one for each page.
How to use: Go to the Widgets section of the Appearance tab. Create as many sidebars as you need. From there you can either set a general rule (example: use Sidebar 1 for all pages, or all posts with a category of uncategorized) or you can go to a specific page and set its sidebars there.
More Information can be found at:https://wordpress.org/plugins/custom-sidebars/
[/toggle]
[toggle title=”CustomPress”]
Description: This plugin allows you to create your own custom post types.
How to use: Start by going to the Content Types section of the CustomPress tab. Click the Add Post Type button. You are only required to fill out a Post Type but you should view all of the options (especially Supports, Description, Menu and Position). Next go to the Settings section and change them as you need. Please note that by leaving default checked your new custom types will NOT be displayed. Lastly you can go back to the Content Types section and create taxonomies and custom fields to put into your post type to customize them even further.
More Information can be found at: https://premium.wpmudev.org/project/custompress/
[/toggle]
[toggle title=”Data Table Generator”]
Description: Create and manage tables from admin panel quick, easy and effective. Make data table responsive with interactive charts and graphs, sorting, pagination, filtering and more.
How to use: Go to the Widgets section of the Appearance tab. Create as many sidebars as you need. From there you can either set a general rule (example: use Sidebar 1 for all pages, or all posts with a category of uncategorized) or you can go to a specific page and set its sidebars there.
More Information can be found at:https://wordpress.org/plugins/data-tables-generator-by-supsystic/
[/toggle]
[toggle title=”Display Widgets”]
Description: This plugin allows you to easily decide which widgets to show or hide on different pages, post, categories, tags and user type.
How to use: To use this plugin, go to the Widgets sections of the Appearance tab. Then click on a widget that is already placed in one of your sidebars to see the options to hide by user type and/or content type.
More Information can be found at: https://wordpress.org/plugins/display-widgets/
[/toggle]
[toggle title=”*Domain Mapping”]
Description: This plugin allows site owners to purchase an external domain name and have it mapped to their WordPress site.
** Requires System Administration Assistance. If you have a domain name you wish to map, contact itshelp@odu.edu
How to use: Go to the Domain Mapping section of the Settings tab of the Network Admin dashboard. Complete these settings as desired. To add a domain name, go to a sub-site dashboard and select Domain Mapping section from the Tools tab.
More Information can be found at: https://premium.wpmudev.org/project/domain-mapping/
[/toggle]
[toggle title=”E-Newsletter”]
Description: This plugin allows you to send newsletters to your subscribers.
How to Use: This plugin is currently experiencing problems and being investigated. When you first activate the plugin follow the prompt to install and configure the plugin. Fill in the 3 tabs with the required information and complete the installation. From there go to the Create Newsletter section of the eNewsletter tab and create your newsletter. Once you are finished and back to the Newsletter section, simply click the send button for the newsletter you wish to send out. Pick who to send it to and hit send. You can monitor how your newsletters do via the Reports section. You can also create different groups for your subscribers by going to the Members Groups section. If you need to change the settings from your initial configuration you can do that in the Settings section. Lastly, place the subscribe widget into a sidebar by going to the Widgets section of the Appearance tab.
More Information can be found at:https://premium.wpmudev.org/project/e-newsletter/
[/toggle]
[toggle title=”Easy Bootstrap Shortcode”]
Description: This plugin allows you to easily add objects such as buttons, tables, tabs, toggle boxes, and more to any post or page.
How to use: Create/edit a post or page and use the icons on the bottom of the toolbar to insert objects. A basic understanding of coding may be needed for some objects.
More Information can be found at:https://wordpress.org/plugins/easy-bootstrap-shortcodes/
[/toggle]
[toggle title=”Easy Site Importer”]
Description: This plugin can help you import your site.
How to use: Go to the Easy Site Importer section of the Settings tab. Click on the Crawl Settings tab to enter your existing site’s URL and what depth of the code you want to be examined. Under the HTML Filter tab you can select what code is to be imported. Next use the Import Settings tab to pick where to import it to and manage the incoming images. Then test the settings and spider the site by using the Test Settings tab and the Spider Site tab. Finally pick what content will be imported by using the Import Content tab.
More Information can be found at:https://wordpress.org/plugins/easy-site-importer/
[/toggle]
[toggle title=”Elegant Builder”]
Description:This plugin allows you to fully customize the layout of content on a page.
How to use: Go to the page you wish to edit. Under the normal editor box you will find the builder. Simply create a column (any size) and fill it with your desired modules. You can make multiple columns and put multiple modules in each column. If you decided you no longer wish to use page builder on that page, you can check the box Disable Page Builder (your work will still be in the page builder, just inactive).
More Information can be found at:http://www.elegantthemes.com/blog/theme-releases/introducing-the-elegant-themes-builder
[/toggle]
[toggle title=”Enable Media Replace”]
Description: Enable replacing media files by uploading a new file in the “Edit Media” section of the WordPress Media Library.
How to use: Under the Media tab click on the library section. Click on the media you would like to replace, and then click on the button that says “Upload a new file” located in the bottom right hand corner of the screen. From there choose the file you would like to put in its place from your library and hit Upload.
More Information can be found at: https://wordpress.org/plugins/enable-media-replace/
[/toggle]
[toggle title=”Events +”]
Description: This plugin allows you to create an event to show case on your site. People can RSVP for the event and you can keep list (or calendar) of upcoming events.
How to use: Just go to the Events tab from there you will need to fill out a few basic settings for the plugin, you can get to the settings by clicking Configure your settings. Once your settings are the way you want them, click the Add Event section of the Events tab. Fill out as much information about the event as you want and publish it (if you need to come back and edit it you can use the Events section of the Events tab). Lastly you can use widgets to help your users navigate to the event.
More Information can be found at:https://wordpress.org/plugins/wp-events/
[/toggle]
[toggle title=”FD Footnotes”]
Description: This plugin allows you to easily create footnotes in your posts or pages.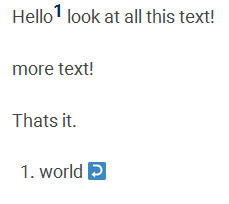
How to use: Simply type [#. What you would like the footprint to say] wherever you want the number to appear. There are a couple of options available to edit in the Footnotes section of the Settings tab.
More Information can be found at:https://wordpress.org/plugins/fd-footnotes/
[/toggle]
[toggle title=”Flickr Album Gallery”]
Description: This plugin allows you to display your galleries from Flickr.

How to use: Simply go to the Add New Gallery section of the Flickr Album Gallery tab and fill in the Flickr Album ID (available in the URL of the album) and the Flickr API Key (requires you to create an app on Flickr). There is also a Flickr widget that can display your photostream in the sidebar.
More Information can be found at:https://wordpress.org/plugins/flickr-album-gallery/
[toggle title=”Global Site Tags Widget”]
Description: Displays a global tag cloud across the entire ODU WordPress network. This allows you to link your site to tags from other ODU WordPress sites.
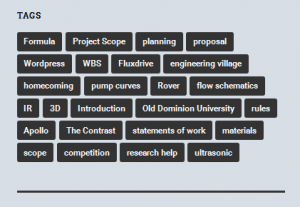
How to use: Simply add the widget to the sidebar of your choice.
More Information can be found at:https://premium.wpmudev.org/project/global-site-tags/
[/toggle]
[toggle title=”Google Analytics +”]
Description: This plugin keeps track of your site’s stats (page views, visitors, etc.).
How to use: Go to the Google Analytics section of the Settings tab and follow the instructions for Basic Site Tracking Settings. You can view your stats in the Statistics section of the Dashboard tab.
More Information can be found at:https://premium.wpmudev.org/project/google-analytics-for-wordpress-mu-sitewide-and-single-blog-solution/
[/toggle]
[toggle title=”Google Analytics Dashboard for WP”]
Description: This plugin allows you to show the stats of your site.
How to use: Go to the Google Analytics tab and follow the instructions to get your access code. You can now place the Google Analytics Dashboard widget onto your pages to show your stats.
More Information can be found at:https://wordpress.org/plugins/google-analytics-dashboard-for-wp/
[/toggle]
[toggle title=”Google Doc Embedder”]
Description: This plugin lets you embed documents into your posts and pages.
How to use: In any post or page simply click Insert Media select a document. Make sure it is set to link to a media file and insert it into the post or page. You can adjust some of the settings via the GDE Settings section of the Settings tab. The button in the WordPress Content Editor does not function correctly, but the plugin does work without this
More Information can be found at:https://wordpress.org/plugins/google-document-embedder/
[/toggle]
[toggle title=”Google Language Translator”]
Description: This plugin allows site visitors to have the site’s content be translated.
How to use: The plugin automatically works but you can also place a widget to select which language to translate to. Lastly, you can adjust a few settings in the Google Language Translator section of the Settings tab.
More Information can be found at:https://wordpress.org/plugins/google-language-translator/
[/toggle]
[toggle title=”Google+ Plugin”]
Description: This plugin links your Google+ account with your site. You can inetegrate Google+ pages and use the Google +1 button.
How to use: Go to the Google+ section of the Settings tab to get your account linked. You can also place a few widgets to show show your activities and let others easily access your Google+ page.
More Information can be found at:https://wordpress.org/plugins/google/
[/toggle]
[toggle title=”H5P”]
Description: Allows you to post and use interactive content onto your site.


How to use: Download either the library or the specific H5P file you would like.
If you chose the library go to the Libraries section of the H5P Content tab. Select your file via the browse button. Disable the file extension check and hit the upload button. Now go to the Add New section of the H5P tab and make sure the Create option is selected. Find the file you wish to use in the drop-down and give it a name. Edit the content however you desire
If you chose an individual file, use the Add New section of the H5P Content tab. Make sure the Upload option is selected. Select your download via the browse button and give it a name. Disable the file extension check and click the Create button.
Now go to the Add New section of the H5P Content tab and make sure the Create option is selected. Find the file you wish to use in the drop-down and give it a name. Edit the content however you desire. When you are down click the Create button. You may now insert this content into any post or page using the Add H5P button above the toolbar when you are editing your post or page.
More Information can be found at: https://wordpress.org/plugins/h5p/
[/toggle]
[toggle title=”HashBuddy”]
Description: This plugin lets you use hashtags, requires BuddyPress or bbPress.
More Information can be found at:https://wordpress.org/plugins/hashbuddy/
[/toggle]
[toggle title=”Head and Footer Scripts Inserter”]
Description: Easily ad your scripts to the WordPress website’s head and footer sections.
How to use: An easy to use and lightweight plugin that gives you the ability to insert custom scripts (HTML, JavaScript, and CSS) in the head and/or footer section of your site.
More Information can be found at: https://wordpress.org/plugins/header-and-footer-scripts-inserter/
[/toggle]
[toggle title=”HTML Import 2″]
Description: This plugin helps you import your HTML site.
How to use: First go to the Import section of the Settings tab. Select HTML. If you are using a single HTML file you can select that here, otherwise choose to change directory to change the settings as you need them. Click the Ready to Import Files link that appears once you save your settings or click Import Files. Click submit.
More Information can be found at:https://wordpress.org/plugins/import-html-pages/
[/toggle]
[toggle title=”Huge IT lightbox”]
Description: This plugin displays images in a way different than the default.

How to Use: You can change the settings via the Huge IT Lightbox tab.
More Information can be found at:https://wordpress.org/plugins/lightbox/
[/toggle]
[toggle title=”Image Carousel”]
Description: Display multiple slick image slider and carousel using shortcode with category. Fully responsive, Swipe enabled, Desktop mouse dragging and Infinite looping. Fully accessible with arrow key navigation Autoplay, dots, arrows etc.
How to use:
- Upload the ‘wp-slick-slider-and-carousel’ folder to the ‘/wp-content/plugins/’ directory.
- Activate the “wp-slick-slider-and-carousel” list plugin through the ‘Plugins’ menu in WordPress.
- Add the short code where you want to display slider
More Information can be found at:httpshttps://wordpress.org/plugins/image-carousel/ or https://wordpress.org/plugins/wp-slick-slider-and-image-carousel/
[/toggle]
[toggle title=”Insert or Embed Articulate Content into WordPress”]
Description: Quickly embed or insert Articulate content into a post or page
How to use: To be Developed
More Information can be found at: http://www.elearningfreak.com/presenter/insert-or-embed-articulate-content-into-wordpress-plugin-premium/?
[/toggle]
[toggle title=”Jetpack by WordPress.com”]
Description: This plugin provides you with many features available to WordPress.com users.
How to use: You must connect to WordPress.com to use it (the login is not connected with your ODU WordPress account but you can create one for free. You can do this by clicking Connect to WordPress.com (should be at the top of the plugin page once the plugin is active). Once you are connected you can turn on and off many features by going to the Jetpack Settings page (think of them as other plugins).
More Information can be found at: https://wordpress.org/plugins/jetpack/
[/toggle]
[toggle title=”Languages”]
Description: Strictly speaking this is not a plugin but it does behave like one. This “plugin” allows you to change the language displayed on your site.
How to use: Simply go to the General section of the Settings tab and scroll down until you see languages. Pick the langauge you would like to use and hit “Save Changes.”
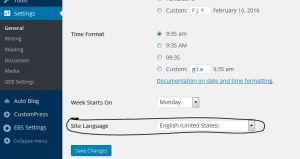
[/toggle]
[toggle title=”Live Stream Widget”]
Description: This plugin displays latest posts and comments in a continuously updating and slick looking widget.
How to use: Click on Appearance > Widgets Menu to see that you have a new widget called Live Stream available. Then it’s as simple as dragging and dropping the widget in to the sidebar that you want to display it.
More Information can be found at: https://premium.wpmudev.org/project/live-stream-widget/
[/toggle]
[toggle title=”Meta Slider”]
Description: This plugin allows you to easily create slideshows
How to use: Simply go to the Meta Slider tab and create your first slideshow or new new slideshow. Add your slides, choose your display options, take note of the shortcode in the Usage box (optional), and save. Create/edit a post or page and paste in the shortcode or click the Add Slider button above the toolbar.
More Information can be found at: https://wordpress.org/plugins/ml-slider/
[/toggle]
[toggle title=”*Multisite Privacy”]
Description: This plugin adds more levels of privacy and allows you to control them across your sites – or allow users to override them.
How to use: Go to Settings > Network Settings in the network admin dashboard. Scroll down to Blog Privacy Settings. Choose your preferred privacy settings and click Save Changes.
More Information can be found at: https://premium.wpmudev.org/project/sitewide-privacy-options-for-wordpress-mu/
[/toggle]
[toggle title=”myCRED”]
Description: This plugin creates a point currency for your site users.
How to use: To start you will need to run the setup which you can do by going to the myCRED Setup section of the Plugins tab. Once you are done with the start up you can tune your settings via the Hooks section of the myCRED tab. You can adjust an individual user’s points via the Users tab. You also have access to a few widgets to show credit balances.
More Information can be found at:https://wordpress.org/plugins/mycred/
[/toggle]
[toggle title=”ODU WP FAS Data”]
Description: Plugin/Widget that parses data from the ODU Faculty Activity System for use on Personal WordPress pages.
How to use: This plugin/widget is only available to sites on the faculty/staff network (https://fs.wp.odu.edu/<sitename>). Additionally, activation checks whether the site owner is faculty or staff. Only Faculty will have access to this plugin; Staff will receive an error when trying to activate the plugin. If faculty data is available from the FAS system, it will pull that data on demand for representation on a personal WordPress site.
Faculty that want to display FAS data should activate the plugin from the Plugins menu. Once activated, the plugin will pull information from FAS and create a draft page called “About“. Faculty can then access the ODU WP FAS Data settings menu by selecting Settings > FAS Data Settings from the admin menu. <add graphic>
The FAS Data Settings menu will take you to a page that will allow you to select the FAS data categories that you want to display on a full page of FAS Data. Select the categories that you with display, un-select those that you do not wish to display.
Select the “Enable Data Page” check box to change the status of the “About” page from draft to published. This will create a full page linked off your WordPress site with the data that you have selected.
Alternatively, after the plugin is activated, you can select Appearance > Widgets from the Admin menu and activate the ODU WP FAS Data Widget on your page. Depending on which theme you have chosen for your site, you can position specific FAS Data in areas of your site such as headers, footers, or side bars. Once with Widget is activated and place, you will be able to select which data you want displayed and whether it will show a full data listing or an accordion style listing.
[/toggle]
[toggle title=”ODUWP Blackboard User Import”]
Description: This plugin will allow faculty to import Blackboard Grade Center course enrollment information into a course site and subscribe all users to that site.
How to use: Log into Blackboard as normal and go to the course for which you are establishing a WordPress site. Go to the Full Grade center and in the top-right corner of the menu, select Offline > Download. In the Data section, make sure you select “User Information Only”. In the Options section, select Tabs as Delimiter Type, then click submit to get your export – save this to your computer.
Login into WordPress and go to the course site you have created. Active the ODUWP Blackboard User Import plugin. Once activated go to your admin menu and select Users > Import Blackboard Users. Near the bottom in the How to import users section – Select the role to which you want to assign users on your site. Next select the “choose file” button and browse to the file you saved from your Blackboard export. Once you have selected that file, select the Submit button to add all users in that file to your site.
[/toggle]
[toggle title=”Page Builder by SiteOrigin”]
Description: This plugin allows you to fully customize the layout of content on a page.
How to use: Go to the page you wish to edit. click into the Page Builder tab (where the Visual and Text tabs are). Add a row (what ever size you need) add desired widgets into row. You may insert multiple rows and have multiple widgets in each row. Once you are done simply publish/update the page. **If you switch back to Visual or Text editor mode, everything will be reset. You may also use this editor in a widget area, such as a sidebar.
More Information can be found at:https://wordpress.org/plugins/siteorigin-panels/
[/toggle]
[toggle title=”Page Links to”]
Description: This plugin allows you to make a page or post point to an external page.
How to use: This feature can be accessed by creating/editing a post or page.
More Information can be found at:https://wordpress.org/plugins/page-links-to/
[/toggle]
[toggle title=”Password Protect Selected Content”]
Description: This plugin allows you to make part or all of a page or post password protected.
How to use: Simply create or edit a post or page and click on the padlock icon on the toolbar. Set a password and click Insert. It will insert two segments of code surrounded by brackets anything between the set will be password protected (you can move the segments wherever needed or simply type between them. Alternatively you can highlight what you want to highlight then click the padlock.
More Information can be found at:https://premium.wpmudev.org/project/password-protect-selected-content/
[/toggle]
[toggle title=”PDF Embedder”]
Description: This plugin allows you to embed PDF files directly into your posts or pages, with flexible width and height. No other services are required.
How to use: Once activated, click Add Media from any page or post, just like adding an image, but drag and drop a PDF file instead.
More Information can be found at: https://wordpress.org/plugins/pdf-embedder/
[/toggle]
[toggle title=”Post Expirator”]
Description: This plugin allows you to set an expiration date for a post or page.
How to use: When you create/edit a post or page and you can find the option on the right. You can change the post/page to draft mode, make it private, or completely delete it (you can also change the category of posts). You can change the settings in the Post Expirator section of the Settings tab.
More Information can be found at:https://wordpress.org/plugins/post-expirator/
[/toggle]
[toggle title=”Post Voting”]
Description: This plugin allows your site’s visitors to vote your posts (or pages or media) up or down.
How to use: The plugin is ready to go however there are a good amount of settings you can change on the Post Voting section of the Settings tab.
More Information can be found at:https://premium.wpmudev.org/project/post-voting-plugin/
[/toggle]
[toggle title=”Postmatic Social Commenting”]
Description: This plugin is a tiny, fast and convenient way to let your readers comment using their social profiles.
How to use: Users click the social network icon of their choice when they want to leave a comment. The social network asks their permission to share their name, profile image, and email address with your site. If they agree, a standard WordPress cookie is added to their browser and the comment form is ready for their reply. When they return to the site they are already authorized.
No WordPress users are created or credentials shared. No one is logged in. This is social commenting.
More Information can be found at: https://wordpress.org/plugins/postmatic-social-commenting/
[/toggle]
[toggle title=”Posts in Page”]
Description: This plugin allows you to display a post within a page.
How to use: To do this go to the Posts in Pages section of the Settings tab and copy the short-code that fits your need. Go to the page you wish to use and paste the shortcode into it. You may need the post ID which can be found in the URL of the post itself (post=post ID number here).
More Information can be found at:https://wordpress.org/plugins/posts-in-page/
[/toggle]
[toggle title=”Q&A WordPress Question and Answer Plugin”]
Description: This plugin allows you to post questions and have others leave a reply, think of yahoo answers.
How to use: This plugin is currently experiencing problems and being investigated. It claims you need to login to post a question or answer and it will redirect you to the login screen however you don’t need to actually login so anyone can post questions or answers. However if you are logged in (and viewing one of your sites) you will not be able to see the individual questions or answers only a list of questions. The admin can monitor the answers via the Answers section of the Questions tab, but he/she may not create their own answer, only edit existing ones. The admin can also create questions, categories, tags, and manage the settings via the Questions tab. This plugin also provides a few widgets to assist in navigation of the questions. This plugin may not work with all themes (by default it supports bp-default, edu-clean, product, twentyeleven, twentyfourteen, twentyten, twentythirteen, twentytwelve, however it will support some others).
More Information can be found at:https://premium.wpmudev.org/project/qa-wordpress-questions-and-answers-plugin/
[/toggle]
[toggle title=”Q2W3 Fixed Widget “]
Description: This plugins fixes positioning of the selected widgets, when the page is scrolled down.
How to use:
- Follow standard WordPress plugin installation procedure
- Activate the plugin through the Plugins menu in WordPress
- Go to Appearance -> Widgets, enable “Fixed Widget” option on any active widget
- Fine tune fixed widget margins on Appearance -> Fixed Widget Options page
More Information can be found at: https://wordpress.org/plugins/q2w3-fixed-widget/installation/
[/toggle]
[toggle title=”Quick Page/Post Redirect Plugin”]
Description: This plugin allows you to direct anyone that visits a page to a different (internal or external) URL.
How to use: Simply create or edit a post or page and check the Make Redirect Active box then fill in where you want it to redirect to (URL). You may also use the Quick Redirects tab if you know the URL of the page you want to add the redirect to. Also in this tab you can find the settings under the Redirect Options section.
More Information can be found at:https://wordpress.org/plugins/quick-pagepost-redirect-plugin/
[/toggle]
[toggle title=”Reader”]
Description: This plugin is already Network activated and allows you to create widgets that display your site’s content in a more readable way.
How to use: These widgets can be applied by clicking on Reader then Settings.
More Information can be found at: https://premium.wpmudev.org/project/reader/
[/toggle]
[toggle title=”Recent Comments”]
Description: This plugin displays a list of recent comments from across your entire network on your front page.
How to use: This plugin is already activated. Although this plugin does require you to edit your theme to place the following function call anywhere where you want to show comments.
“display_recent_comments( NUMBER, CONTENT_CHARACTERS, GLOBAL_BEFORE, GLOBAL_AFTER, BEFORE, AFTER, LINK);”
More Information can be found at: https://premium.wpmudev.org/project/recent-comments/
[/toggle]
[toggle title=”Recent Global Comments Widget”]
Description: This plugin shows all the latest comments from across your entire network on your main site.
How to use: This plugin is already activated. Although this plugin does require you to edit your theme to place the following function calls anywhere you want to show comments.
“display_recent_comments( NUMBER, CONTENT_CHARACTERS, GLOBAL_BEFORE, GLOBAL_AFTER, BEFORE, AFTER, LINK ); “”display_recent_comments( NUMBER, CONTENT_CHARACTERS, GLOBAL_BEFORE, GLOBAL_AFTER, BEFORE, AFTER, LINK);”
More Information can be found at: https://premium.wpmudev.org/project/recent-global-comments-widget/
[/toggle]
[toggle title=”Regenerate Thumbnails “]
Description: This plugin allows you to resize (regenerate) thumbnails.
How to use: You can either regenerate all images by going to the Regen. Thumbnails section of the Tools tab or you can select individual images by going to the Library section of the Media tab and viewing your media in list format. you may then select which images you would like to regenerate.
More Information can be found at:https://wordpress.org/plugins/regenerate-thumbnails/
[/toggle]
[toggle title=”RSS Post Importer”]
Description: This plugin lets you set up an import posts from one or several rss-feeds and save them as posts on your site, simple and flexible.
How to use: Once the plugin has been activated go to RSS Post Importer section under the Settings tab. Near the top right of your screen you should see the “Add new feed” button. Input the feed name and url, then set all other settings as you see fit. When finished click on the “Save and import” button. Post from the RSS links should now appear in your post section.
More Information can be found at: https://wordpress.org/plugins/rss-post-importer/
[/toggle]
[toggle title=”RSS Via Shortcode for Page & Post”]
Description: This plugin makes it easy to display an RSS feed on a page or in a post.
How to use: Insert the shortcode desired into page or post location. Feeds will only be displayed. They will not be stored in database, so content is continually fresh for search engines.
More Information can be found at: https://wordpress.org/plugins/rss-via-shortcode-on-page-post/
[/toggle]
[toggle title=”*Shibboleth”]
Description: Allow users to be authenticated by Shibboleth using their Monarch Key ID’s.
How to use: ** this item is already network activated and used to link to your Monarch Key ID’s.
More Information can be found at: https://wordpress.org/plugins/shibboleth/
[/toggle]
[toggle title=”Simple Calendar”]
Description: This plugin allows you to place your Google Calendar into your site. Was formerly known as Google Calendar Events

How to use: Start by going to the Settings section in the Calendars tab and entering in your API Key (requires you to create an app). Next go to the Add New section and title your feed, if you feel comfortable you can also change the layout in the visual editor, and change the settings in the Calendar Settings box (click on the Google Calender portion to open the box to paste in your Calendar ID. Once you are done, take note of the given short-code and save your feed. Then create or edit a page or post and paste in your short-code. You can also add a widget to display your upcoming events by going to the Widgets section of the Appearance tab. You must share the calendar publicly to use.
How to Create an API:
- Go to Google Developer Console and and sign in with the account you wish to use the calendar from
- Create a new project
- From your project’s dashboard click “Enable and Manage API Keys”
- Under the heading Google Apps APIs click on Calendar API
- Enable your Calendar API
- Click on the “Go to Credentials”
- Click on API key followed by clicking the Server key option
- Name your API and press “Create”
- You have now created your API. All that is left is to paste it where you are prompted on ODU WordPress
How to Make your Calender Public:
- Select the calendar you wish to work within Google Calendars
- Use the drop-down menu to select “Share”
- Choose to make the calender public by checking the corresponding box
- Go to the Calendar Deatils section and under the header Calendar Address copy the calendar ID.
- Paste this where prompted in ODU WordPress
More Information can be found at:https://de.wordpress.org/plugins/google-calendar-events/ or http://www.wpbeginner.com/plugins/how-to-add-google-calendar-in-wordpress/
[/toggle]
[toggle title=”Simple Custom CSS”]
Description: This plugin allows you to enter your own CSS code to override the CSS of your theme or plugin.
How to use: You can find the editor in the Custom CSS section of the Appearance tab. This plugin requires a knowledge of CSS code.
More Information can be found at:https://wordpress.org/plugins/simple-custom-css/
[/toggle]
[toggle title=”Simple Image Widget”]
Description: This plugin adds a widget (Image) that will display an image.
How to use: Simply add it to your sidebar in the Widgets section of the Appearance tab.
More Information can be found at:https://wordpress.org/plugins/simple-image-widget/
[/toggle]
[toggle title=”Simple YouTube Embed”]
Description: This plugin allows you to easily embed YouTube Video in your WordPress website.
How to use: Create a new post/page and enter your YouTube Video URL to embed it. make sure the URL is on its own line and not hyperlinked. In order to avoid formatting errors, it’s better to place the URL into the content area in TEXT mode.
More Information can be found at: https://wordpress.org/plugins/simple-youtube-embed/
[/toggle]
[toggle title=”*SiteOrigin CSS”]
Description:An advanced CSS editor from SiteOrigin.
How to use: While a knowledge of CSS is helpful it is not necessary. Go to the Custom CSS section under the Appearance tab. A text prompt window will appear. In the upper right hand corner of the text prompt there will be a eye button. Click on it. You will now be in a visual editor for your template. From here click on any thing in your theme you’d like to change. On the right hand side of your screen there will be options to adjust the look of any item in your theme.
For a more detailed explanation please watch the getting started video.
More Information can be found at: https://wordpress.org/plugins/so-css/
[/toggle]
[toggle title=”SiteOrigin Widgets Bundle”]
Description: This plugin gives you access to several widgets. These include buttons, sliders, carousel, maps, and a text editor.
How to use: Under the SiteOrigin Widgets section of the Plugins tab you can decide which widgets you would like to activate and deactivate. Then simply add one of the widgets to a sidebar to start using it, this is accessed in the Widgets section of the Appearance tab.
More Information can be found at:https://wordpress.org/plugins/so-widgets-bundle/
[/toggle]
[toggle title=”SmartCrawl”]
Description: This plugin makes your content easy to find on search engines like Google and Bing by making web crawlers smarter.
How to use: This plug-in is already Network Activated for all. Simply go to the SmartCrawl section under the settings tab. A in-depth guide on how to use this plugin can be found here.
More Information can be found at: https://premium.wpmudev.org/project/smartcrawl-wordpress-seo/?utm_expid=3606929-63.d1uVTJccR86NzPN0HkuzLA.0
[/toggle]
[toggle title=”Social Media Feather”]
Description: This plugin allows you to link your social media accounts to your website so people can share your posts/pages/media or encourage them to follow you.
How to use: This can be done by going to the Social Media section of the Settings tab. There are a lot of options but don’t get overwhelmed as a lot of them are not necessary, however there are some that super important such as which profile on Facebook is yours, or do you want to display the sharing buttons on each post, etc. You can also place the follow and share prompts in your sidebar by using the widgets in the Widgets section of the Appearance tab.
More Information can be found at:https://wordpress.org/plugins/social-media-feather/
[/toggle]
[toggle title=”Subscribe by Email”]
Description: This plugin lets your site visitors subscribe to your site by just typing in their email.
How to use: This allows them to receive email updates when something is posted. You must either add the widget to your sidebar by going to the Widgets section of the Appearance tab or add the Follow button to your website by going to the Settings section of the Subscriptions tab. You can manage your subscribers by using the Subscription tab. From there you can add users by email, alter your welcome email, place a follow button on your site, and more.
More Information can be found at:https://premium.wpmudev.org/project/subscribe-by-email/
[/toggle]
[toggle title=”Table of Contents Plus”]
Description: A powerful yet user friendly plugin that automatically creates a table of contents. Can also output a sitemap listing all pages and categories
How to use: In the TOC+ section of the Settings tab you can change the setting to decide where and when your table of contents show up. The appearance of the table can also appear hear. Depending on the settings chosen, the table will automatically appear the when needed according to the settings. You can also manually insert it using source code.
More Information can be found at: https://wordpress.org/plugins/table-of-contents-plus/
[/toggle]
[toggle title=”TablePress”]
Description: TablePress allows you to easily create and manage beautiful tables. You can embed the tables into posts, pages, or text widgets with a simple Shortcode. Table data can be edited in a speadsheet-like interface, so no coding is necessary. Tables can contain any type of data, even formulas that will be evaluated. An additional JavaScript library adds features like sorting, pagination, filtering, and more for site visitors. Tables can be imported and exported from/to Excel, CSV, HTML, and JSON files.
How to use: Once activated, there will be a new TablePress tab. There you can import , export, and create new tables. You can then add the table to any post or page by inserting the shortcode.
More Information can be found at:https://wordpress.org/plugins/tablepress/
[/toggle]
[toggle title=”TubePress”]
Description: This plugin allows you to display video galleries from Vimeo or Youtube.
How to use: Go to the TubePress section of the Settings tab to setup the plugin. You will need a developer key from Youtube (this process is described here) or Vimeo. Place this key in the Feed tab of TubePress’s options. You may place the videos in your posts or page using the short-code [tubepress] into the visual editor (this will use your default settings from your TubePress Settings page, you can further edit this shortcode to create a unique video gallery for each page using various other shortcodes) or you may place the widget in a sidebar by going to the Widgets section of the Appearance tab (again will use default settings). Please note you may only access one video at a time. You may have this video in multiple places but only one video per location is allowed. There are also several widgets you may use to display videos.
More Information can be found at:https://wordpress.org/plugins/tubepress/
or here: http://support.tubepress.com/customer/portal/articles/2073050-add-tubepress-to-a-post-or-page
[/toggle]
[toggle title=”*Users Widget”]
Description: This plugin displays a simple list, or a mosaic list of random users complete with avatars in any widget area.
How to use: Go to Appearance > Widgets in the admin area of your main site, where you’ll now see the Users Widget. Simply drag the widget to an available sidebar and you’ll be presented with several settings.
More Information can be found at: https://premium.wpmudev.org/project/users-widget/
[/toggle]
[toggle title=”Velvet Blues Update URLs”]
Description: This plugin updates all urls in your website by replacing old urls with new urls. To get started: 1) Click the “Activate” link to the left of this description, and 2) Go to your Update URLs page to use it.
How to use: Once Activated, go to the Update URLs section of the Tools tab. There replace the old URL and New URL feeds, then select the where the links should be replaced.
More Information can be found at: https://wordpress.org/plugins/velvet-blues-update-urls/screenshots/
[/toggle]
[toggle title=”Virtue/Pinnacle Toolkit”]
Description: This plugin allows you to further edit the Pinnacle theme or the Virtue theme by customizing the page layout and creating a portfolio.
How to use: This plugin is currently experiencing problems and being investigated.
More Information can be found at:https://wordpress.org/plugins/virtue-toolkit/
[/toggle]
[toggle title=”Wiki”]
Description: This plugin allows you to have your own wiki pages on your site.
How to use: Simply go to the Wikis tab to add a Wiki page. All of your wiki pages will be accessible on the wiki page itself. You can set the slug and other settings for the plugin using the Wiki Settings section of the Wikis tab. You can also assign tags and categories to each article.
More Information can be found at:https://wordpress.org/plugins/wordpress-wiki-plugin/
[/toggle]
[toggle title=”WordPress Appointment Schedule Booking System”]
Description: This plugin helps you manage your schedule by allowing you to create appointments.
How to use: This plugin is currently experiencing problems and being investigated.
More Information can be found at:https://wordpress.org/plugins/wp-appointment-schedule-booking-system/
[/toggle]
[toggle title=”WordPress Importer”]
Description: This plugin will allow you to Import posts, pages, comments, custom fields, categories, tags and more from a WordPress export file.
How to use: Upload the WordPress-importer folder to the /wp-content/plugins/ directory. Activate the plugin through the ‘Plugins’ menu in WordPress. Go to the Tools > Import Screen, click on WordPress
More Information can be found at: https://wordpress.org/plugins/wordpress-importer/
[/toggle]
[toggle title=”WP Custom CSS”]
Description: This plugin allows you to edit the CSS of your current theme.
How to use: Simply go to the Custom CSS section of the Settings tab and enter your code. This plugin requires a knowledge of CSS code.
More Information can be found at:https://www.tipsandtricks-hq.com/wordpress-custom-css-plugin-6413
[/toggle]
[toggle title=”WP Email Template LITE”]
Description: This plugin allows you to further customize emails that are sent from your WordPress because of other plugins.
How to use: You can edit the template used by going to the WP Email tab. You may then test the template by going to the Send WP Emails section.
More Information can be found at:https://wordpress.org/plugins/wp-email-template/
[/toggle]
[toggle title=”WP Google Maps”]
Description: This plugin allows you to show a Google maps view of a location.
How to use: After a recent update you will now be required to have a Google Maps API code to access the plugin’s services. To do so, simply go to the Maps section of the Maps tab and you will see a prompt at the top of the screen to create API code. After you input your code in the same section you can create your map. The General Settings tab will give you the short-code to place in the visual editor of a post or page. Alternatively you could also place the widget into a sidebar by going to the Widgets section of the Appearance tab. If you wish to remove controls from the map or change the role required to change the map you can go to the Settings section.
More Information can be found at:https://wordpress.org/plugins/wp-google-maps/
[/toggle]
[toggle title=”WP Google Maps – Gold Add-on”]
Description: This is the Gold Add-on for WP Google Maps. This enables mass-marker support (marker clustering)
How to use: Please review extensive online documentation at http://www.wpgmaps.com/documentation/
More Information can be found at: https://wordpress.org/plugins/wp-google-maps/
[/toggle]
[toggle title=”WP Google Maps – Pro Add-on”]
Description: This is the WP Google Maps Pro Add-on which enables you to add descriptions, pictures, links and custom icons to your markers as well as allows you to download your markers to a CSV file for quick editing and re-uploading them when complete..
How to use: Please review extensive online documentation at http://www.wpgmaps.com/documentation/
More Information can be found at:https://wordpress.org/plugins/wp-google-maps/
[/toggle]
[toggle title=”WP Google Maps – Visitor Generated Markers”]
Description: This plugin allows your visitors to create and input markers on your maps.
How to use: Please review extensive online documentation at http://www.wpgmaps.com/documentation/
More Information can be found at:https://wordpress.org/plugins/wp-google-maps/
[/toggle]
[toggle title=”WP QuickLaTeX”]
Description: This plugin allows you to type formulas and equations into posts or pages so they are displayed neatly.

How to use: This plugin can be tricky to learn so your first step should be to go to the QuickLaTex tab and read the Getting Started section particularly the example they post. In a nutshell you use this plugin by inserting the short-code [latexpage] followed by the mathematical expression you wish to display into the visual editor of either a page or post. This will take a little experimenting to get the syntax down. You can visit their full guide here.
More Information can be found at:https://wordpress.org/plugins/wp-quicklatex/
[/toggle]
[toggle title=”WP RSS Aggregator”]
Description: This plugin imports and aggregates multiple RSS Feeds.
How to use: With this version of RSS Aggregator you will be able to aggregate a many RSS feeds as you like from as many sources as you like. Using shortcodes you can then display the imported feed(s) from one or more sources on your website.
More Information can be found at: https://wordpress.org/plugins/wp-rss-aggregator/
[/toggle]
[toggle title=”WP User Avatar”]
Description: Allows you to upload a custom avatar for your profile picture.
How to use: Simply go to the Avatars tab to adjust the settings and pick your avatar. You may insert your avatar directly into a post or page by using the avatar icon on the toolbar. The widget for this plugin is flawed.
More Information can be found at:https://wordpress.org/plugins/wp-user-avatar/
[/toggle]
[toggle title=”WP-Polls”]
Description: This plugin allows you to create polls and post them to your posts or pages.
How to use: First, go to the Add Poll section of the Polls tab. Once you have added your poll you can edit it in the Manage Polls section (take note of the poll id). Go to the page or post you wish to insert the poll into and click the poll icon from the toolbar. Enter the poll id corresponding to the desired poll. Place the Polls widget in a sidebar using the Widgets section of the Appearance tab to place a poll in the sidebars. You can change the settings in the Poll Options section of the Polls tab. To create a Polls archive simply create a new page and make the permalink “pollsarchive” (this can be done by naming the page polls archive or changing the permalink after you named it something else). Type in the short-code [page_polls].
More Information can be found at:https://wordpress.org/plugins/wp-polls/
[/toggle]
[toggle title=”WP Pro Quiz”]
Description: A powerful and beautiful quiz plugin for WordPress.
How to use:
- Upload the wp-pro-quiz folder to the /wp-content/plugins/ directory
- Activate the plugin through the ‘Plugins’ menu in WordPress
More Information can be found at: https://wordpress.org/plugins/wp-pro-quiz/installation/
[/toggle]
[toggle title=”WPtouch Mobile Plugin”]
Description: This plugin helps make your website mobile phone friendly. This means that when it is viewed from a mobile device it will change the layout (slightly) of your site so the user can easily navigate and use it on their device
How to use: Although it is ready to go you can change a lot of settings to customize how your page is viewed. First you can go to the Core Settings section of the WPtouch tab. Next, go to the Theme Settings section. Finally, go to the Menus section. Once you have made all the changes you desire your site should now be phone friendly.
More Information can be found at:https://wordpress.org/plugins/wptouch/
[/toggle]
[/toggles]