Importing
Exporting
The process of moving your site
The file used in importing and exporting can contain all of your posts, pages, comments, custom fields, terms, navigation menus or custom posts.
Importing
The process for importing will vary a little depending on if you are importing from a separate WordPress account or from an HTML website. However the first step is to check if ODU WordPress supports the themes and plugins that you require (if any). A complete list of plugins and themes can be found here.
If you need additional plugins or themes, Faculty and staff can request specific plugins and themes by submitting a request to wordpress@odu.edu. Within three days, the new plugins/themes will be added to the pre-production system where they can be tested by other faculty and staff members. (The pre-production system can be accessed at http://wp.pprd.odu.edu from on campus or through the ODU VPN.)
After plugins/themes have been thoroughly tested in the pre-production environment for at least two weeks, they can be moved to the live production environment for everyone to use. ITS will move all new themes and plugins from pre-production to production at the beginning of every semester, and at the halfway points of Fall and Spring semesters. In order to limit service disruptions, security updates will be the only changes applied to the production system during the semester periods.
Importing from another WordPress site
If you already have a WordPress site somewhere else, you should visit the ‘Exporting’ section first to learn how to export your existing WordPress site. Once your existing WordPress site is exported you can import it to make the transition to ODU easier.
One important thing to keep in mind is that if you used special plugins or themes on your old site we may not have them installed at ODU. You can find a list of plugins and themes that are currently installed here. If you would like to request new themes or plugins let us know at the “What would you like to see tab” or by sending email to wordpress@odu.edu.
- From the dashboard of your new ODU WordPress site, go to the “Tools” tab and then select “Import.”

- Select the type of site your old site/blog was hosted on (i.e. WordPress).
- Click on Browse and locate the XML (.wxr) file exported from your old WordPress site and select “Import.”
- This may take a while but WordPress will send you an email once it has finished.
Importing from an existing HTML Web site
If you have a web page that is HTML based and wish to migrate this to a WordPress site, there are a number of options that are available which include manually migrating your site, using a pre-made theme/plugin or paying a third party to have an HTML to WordPress conversion accomplished. We are going to focus on the second one using a pre-made plugin to pull in content.
Many faculty, staff and students, previously had or maintained web sites across various systems at ODU using HTML and CSS (i.e. ODUEdit). With the release of WordPress, many users and organization may wish to migrate these sites to WordPress because of system deprecation, ease of management or improved functionality. Manually migrating your site from HTML to WordPress may require you to get into your web site code and understand what is being migrated and to where. You will need to access your current web site, select the WordPress theme you will be migrating your data to and have experience in HTML, CSS and some PHP to migrate chunks of code at a time into the new WordPress site. This requires customization of the CSS layout for the Theme you have chosen and is something better described through other documentation already on the web.
The following information will focus on migrating a site using a plugin which is probably the best option for speed and time invested. We will discuss two plugins available in the WordPress plugin repository and installed on the ODU WordPress system. One is called HTML Import 2 and the other is Easy Site Importer .
No matter which option you choose, there are two things that you must do or decide about prior to beginning any migration:
- Is this your personal site or some other type of site? Personal sites will always use your MidasID for the site name, while other sites will require you to choose the name that will be used based on the convention https://sites.odu.edu/<your_new_name>
- Decide on the WordPress Theme that will be used for your WordPress site. You can view the list of existing Themes that have been loaded on the ODU WordPress system.
Once those two items are addressed, you can log into WordPress (https://wp.odu.edu/wp-login.php) using your MidasID and password. Once logged in, click on the Manage My Sites tool from the menu bar. The will allow you to create your new site. Once your site is created, go to the “Dashboard” for that site.
After you get to the new WordPress site, click on Appearance from the menu and select Themes. When the full list of themes comes up, find and activate the Theme that you have selected to format your site. You can alternatively click on Appearance then Customize to make changes to how your site will be displayed based on the Widgets and other functions available in that Theme.
The last series of actions you need to take is to click on Plugins > then select either HTML Import 2 or Easy Site Importer (depending on which you chose) and select Activate (DO NOT ACTIVATE both of them at the same time, chose one or the other). This will activate the plugin and allow you to access the menu system for it to help guide you through the migration process.
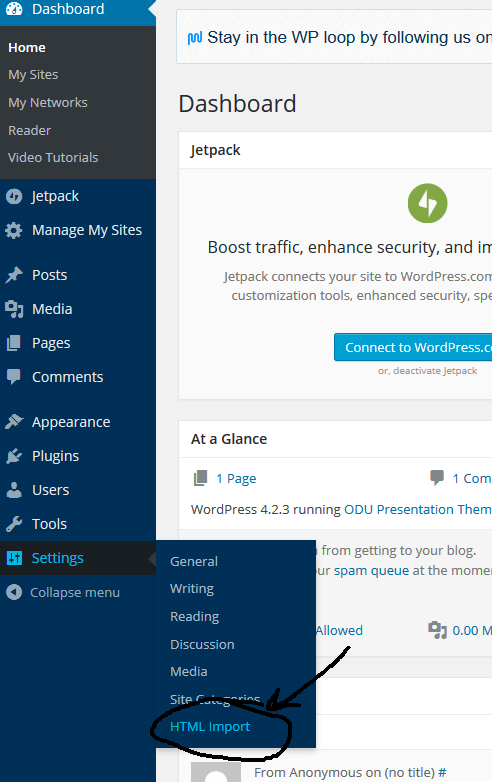
To access the menu system for HTML Import 2 select Settings from the admin menu and select HTML Import to bring up a user menu system that will guide you through the migration process.
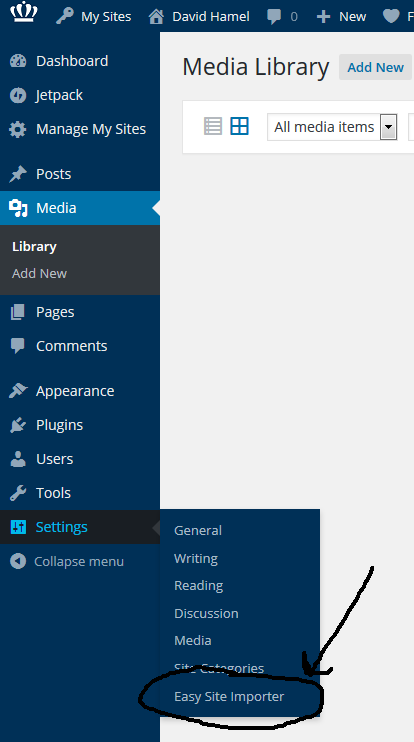
Alternatively you could activate Easy Site Importer by clicking on Settings from the admin menu, then clicking on Easy Site Importer to access its user menu to guide you through the migration process.
Once you have activated one of the tools and are in the tools user menus, you will need to provide information related to the current web materials location (URL), what blocks of HTML you will be importing and where the application should start scraping. You can refer to HTML Import 2 plugin for additional information on how the plugin works. Alternatively you can refer to the Easy Site Importer plugin page for additional information on how that plugin works.
After you click the button to Import Files your old site will be imported into a similar directory structure & content in your new WordPress site (for both tools).
Exporting
If you would like to move your site to a different hosting site, WordPress can help you via exporting.
- From the Dashboard go to the “Tools” tab and select “Export”
- Choose what data you would like exported and select “Download Export File”
- Select save file in the pop-up box

In addition to the tools to import and export your site that are provided in WordPress, additional plugins have been installed to add additional capabilities in this area. If you have multiple sites to manage there are additional tools you might consider reviewing:
- Blog Importer: Imports comments, blogs and authors from other WordPress sites.
- Cloner: clones sites in a network installation
- Multisite Content Copier: Copies information from one site to another in a multi-site installation
Put it all together, the process of moving your site
Let’s say you have a site outside of ODU WordPress you would like to import. This section outlines the process of moving it.
- Verify ODU WordPress has all plugins that are essential to your site, you can check here. If you require more plugins let us know at wordpress@odu.edu. We will load them into Preproduction as soon as possible and then Production during the next update.
- Export your site.
- Make sure you have all of the media files (pictures, documents, etc) somewhere accessible because these will not be included in your export file.
- Import your site in Preproduction, please note that the Preproduction server can only be accessed at ODU.
- Piece your site back together by picking the theme, placing the menus and widgets, activating plugins, uploading media files (provided they keep the same name, they will fall back into place with no additional effort), etc.
- Check your site for any issues, correct them as needed.
- Once your plugins and theme are all available in Production and you feel your site is ready, export your site from Preproduction and import your site on the Production server. Repeat steps 5 and 6 as needed.


